DIY Photography Wall Art from Baby Crib Springs

Are you looking for creative ways to decorate your walls and display numerous photos without making it look like your crazy great-aunt’s hallway? Now you can with this ingenious DIY project!
While I would love to take credit for this idea, it is really my wife’s brainchild. Apparently a desire to decorate the walls, the concept of saving money while using up junk in one’s basement to make the house look pretty, combined with time spent surfing the web will generate exceptionally creative ideas like this. (Yes, there are others who have done similar. However, that was only discovered after the original brainchild was birthed.) So, let’s get started, shall we?
Cost
$10 (does not include cost of crib springs)
Materials
- Standard spring set from baby crib – These are typically found on older cribs; so, if you don’t already have one, go through your parents’ attic, hit up local yard sales, scout the curbs on trash day, or look for them through your neighbor’s windows.
Tip: It is best to not take a set of crib springs from a sleeping baby. While I’m certain that you will be ready to jump on this project immediately upon reading, wait until the baby awakens or outgrows the crib.
- Wall hooks – I picked up a set of two oil-rubbed bronze hooks from Walmart for $2-something. Unless your set of springs is particularly heavy, two hooks should hold it just fine when anchored into studs (and, no ladies, I’m not referring to the cast of Magic Mike).
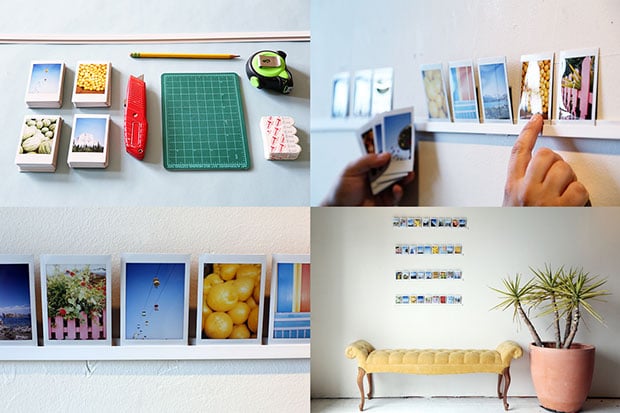
- Mini clothes pins (or similar attachment device) – We used a collection of wooden mini clothes pins found in the craft section at Walmart for roughly next to nothing.
- Your photos – Sure, this may seem like a “duh!” moment, but after witnessing the incompetence of humans for a quarter century, I’m not taking my chances. Typically, as a photographer, I revolt at even the mention of [a certain large corporation’s retail locations frequently known by their smiling faces] photo processing center. However, for this project (and due to my beloved’s impatience to get it up), my wife said that printing them at [the place of which we do not speak] would be fine…with no regard to my panicked protests. But, at $.19 a piece for one-hour 4×6 prints, you can fill up that dang piece of art for about $5.
Tools
- Power drill
- Drill bit slightly narrower than mounting screws
- Screw bit (for drill) or hand-powered screw driver
- Tape measure
- Level and/or chalk line, depending on your level of OCD

Assembly
- Determine where you would like to hang this contraption
Measure, mark on-center, draw a diagram, hire a freaking engineering firm — it really doesn’t matter. Just find your spot. - Find your studs
My wife thought I would make an excellent anchor point, but I assured her that I was not going to hold that dang thing. If not properly anchored (e.g. simply stuck into drywall), you risk it coming loose and potentially killing you while sleeping on the couch after giving up on trying to find late night TV humorous. - Mount your hanging hooks
Using the drill, bore out holes for your mounting screws. Again, make sure you’re drilling into a stud (yeah, my mind went there, too) or prepare to unexpectedly meet your maker. Then, using the drill or screw driver, secure the hooks to the wall using the included screws. (Because of the length of my screw bit, I had to finish tightening the mounting screws by hand. Your experience may be different.) - Secure the photos to the springs
This can be done with the suggested mini clothes pins, paper clips, baler twine (after punching a hole in the picture), Super Glue, etc.
Once it’s all prettyfied, hang that thing on the wall!
About the author: Allen Mowery is a photographer based in Central Pennsylvania. Visit his website here. This post was originally published here.