Crater Lake in Oregon
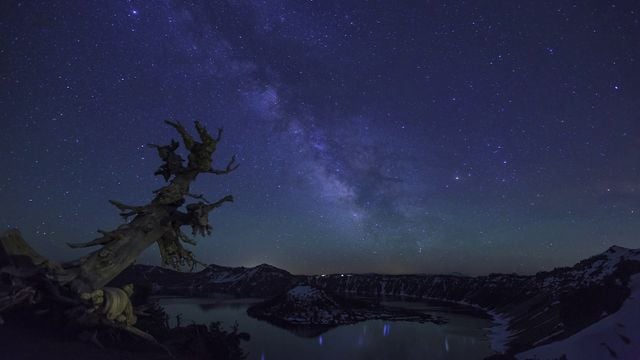
Crater Lake in Oregon is such a beautiful place that post-processing isn’t really even needed for photographs taken there. Here’s an unprocessed photograph I took there this past summer on a road trip with friends:

Canon 40D + 24mm 2.8 at f/8, 1/250s, and ISO 100.
Shooting landscapes with snow and water can sometimes be kind of tricky to expose, so I would recommend shooting manual to nail your exposures the way you want them. For this photograph I used partial metering and tried to properly expose the mountain. Luckily, a cloud was passing over at the moment, making it a little easier to expose the water, mountains, and sky without blowing any highlights.
I only wish I had a wider lens, since the 24mm on a crop body (the 40D) is effectively a 24 x 1.6 = 38.4mm lens. A wider lens would have helped to make the shot more dramatic.
 In terms of post-processing, my goal with this photograph was to make it “pop” a little more than it does. Even though the scene is beautiful, the unprocessed photograph is a little too dull and ordinary.
Here are the initial changes I made during post processing (in the “basic” tab of Adobe Camera Raw):
White Balance: Changed to daylight, which warmed it an almost insignificant amount.
Exposure: Increased by half a stop. The original seemed a tiny bit underexposed to me.
Recovery: Boosted this up to 40 to recover some of the clipped areas in the clouds and snow.
Fill Light: Notice how in the unprocessed photo the bottom left hand corner is filled with shadows. I filled in these shadows a little by increasing fill light to 20.
Blacks: The black point seemed fine, so I left this unchanged.
Brightness: Didn’t need to increase brightness. Left unchanged.
Contrast: Increased this by 50 to recover some of the contrast lost in other steps.
Clarity: Increased to 30 to gain lost detail in the clouds.
Vibrance: Added a bit more color with +20.
This is the resulting photograph after the initial changes (hover your mouse over it to compare it to the original):

Now we move onto sharpness, color, and vignetting.
Sharpness: +80. Making the landscape nice and sharp for prints, if needed.
Saturation: Blues -10 to make the sky and water more natural.
Luminance: Yellows and Greens +50 to bring out the trees. Blues and Purples -50 to bring out the clouds by darkening the sky. Makes the photograph more dramatic.
Lens Vignetting: Amount -20 to add a little vignetting.
The resulting photograph after these changes (hover to compare with previous version):

Now can do some more detailed edits in Photoshop, after doing a lot of general changes using Adobe Camera Raw.
One of the things I like to do with clouds is burn them to make them a little more dramatic. Using the Burn Tool with Exposure set at 20%, I burned the bottom of each cloud with one pass to make them a little darker.
Next, in the bottom right hand corner of the frame, there’s a tree that’s slightly visible. Since not enough of the tree is visible to help it frame the scene, I find it a little distracting, so I removed it using the Clone Stamp tool.
 Finally, notice how the island in the lake and the snowy mountains in the background are a little hazy. I’d like to increase the contrast a little specifically in these areas without affecting the sky in the background or the trees in the immediate foreground.
Using the quick selection tool, I select the lake, island, and mountains, and increase the contrast by applying a slight “s-curve” in Curves (Image->Adjustment->Curves or Ctrl+M). Screenshot of the curve to the left.
The final image that results from these two edits in Photoshop is below. Hover your mouse over the image to compare it to the previous image, before the cloud and contrast changes.

That’s it! We’re done. You can also hover over this link to compare the image to the original unprocessed photograph. Our goal was to make the photo “pop” a little more.